What is n8n and how do I use it on Contabo?
Table of Contents
- About n8n
- System requirements
- How to install n8n?
- How to add users to your instance?
- I forgot my password to the application
- Resources
About n8n
n8n is a workflow automation tool that lets you connect different apps and services to automate business processes, without having to write code. It supports over 400 integrations, making it ideal for automating repetitive tasks, orchestrating APIs, and building complex workflows visually.
You can purchase a VPS with a free pre-installed n8n 1-click Add-On on our website here.
The 1-click Docker-based script runs on Ubuntu LTS 24.04 and includes a free SSL certificate (Let’s Encrypt), Caddy, and n8n.
After ordering your Contabo VPS, you'll receive your credentials (URL and username) in your order confirmation email. The initial password for your 1-Click application will be the one you set during the order process. You can also find all your login information anytime in the Contabo Customer Panel, under the detailed view of your VPS.
For detailed guidelines on installing n8n, continue to the How to install n8n? section.
The first time you log in to your n8n instance, we recommend that you request your Community License, which is free of charge for lifetime.
Once you log in to your n8n instance, you will see a pop-up message that offers you the free license key. Enter your email and click ‘Send me a free license key’ to receive it on your email.
System requirements
These are the system requirements for the n8n add-on:
| OS | Ubuntu 24.04 LTS | |
| Minimum | Recommended | |
| RAM | 2 GB | 8 GB |
| Storage | 10 GB | 50 GB |
| CPU | 1 | 2 |
| VPS | Cloud VPS 10 | Cloud VPS 10 |
| VDS | Cloud VDS S | Cloud VDS S |
How to install n8n?
1. Choose your desired product on the n8n Hosting on Contabo VPS page.
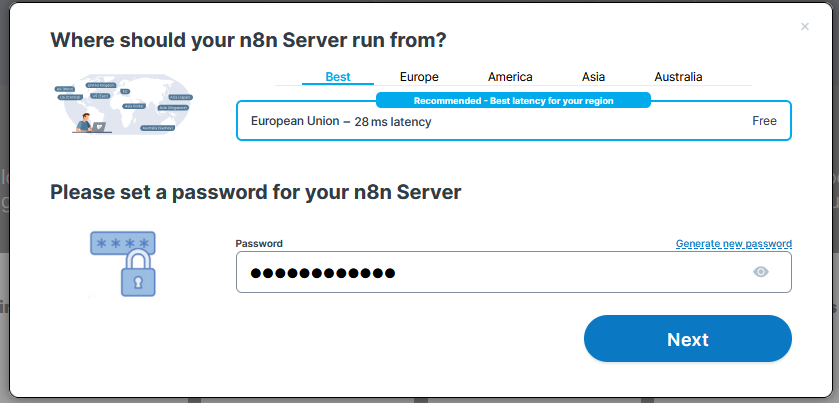
2. Select the location you want your server to run from and set the password for your server. Important: The password will be used both for accessing the VPS and the application itself.
3. Proceed based on whether you’re a new Contabo customer, or you’re already a Contabo customer.
- If you're a new Contabo customer, fill out the Personal Data tab and choose your payment method
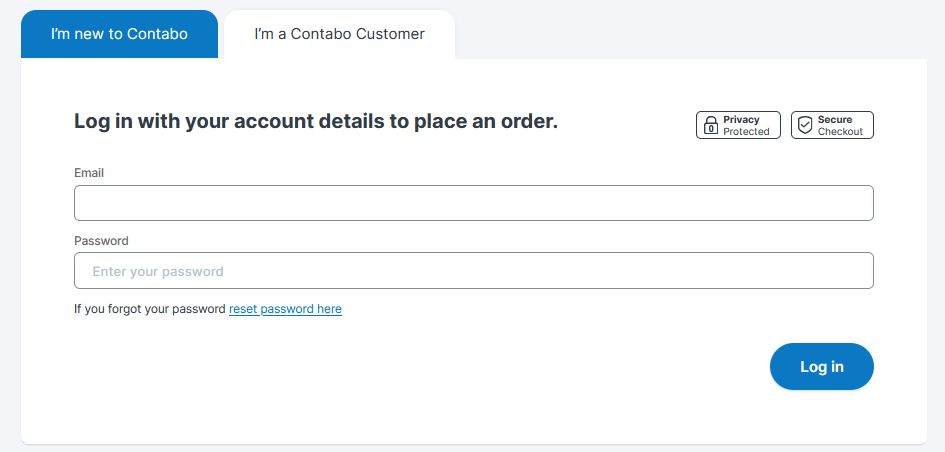
- If you're an existing Contabo customer, log in with your account details to place an order.
4. Continue to the Confirmation section. Click 'Order & Pay' to place your order. Important: It may take a few minutes for your order to be processed. Once done, you will receive an email with your login credentials.
5. Log in to the Customer Panel.
6. Click on ‘Servers & Hosting’ on the left side and select VPS from the drop-down menu.
7. Please note that it may take up to 30 minutes for your application to be installed and activated. Once it’s installed, you can access the application directly by clicking on its logo under the ‘Quick Action’ section on the right side.

If you are an existing customer and you want to run the application on an existing instance:
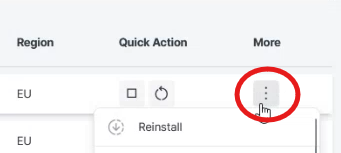
1. In the VPS section, choose the instance you want your application to be installed on
2. Click on the three vertical dots under ‘More’, then click ‘Reinstall’
3. Select the preferred installation type (Standard Installation/Application Installation/Advanced/Custom Image Installation)
4. Proceed based on the installation type you chose;
If you chose Standard Installation/Application Installation:
- Choose the relevant application from the ‘Application’ drop-down list and set your password
If you chose Advanced/Custom Image Installation:
- You can install the image by using an SSH-key
- If you choose the application from the Cloud-Init drop-down list, you will need to enter the password to continue the installation.
5. Click ‘Install’
6. The application button will appear under ‘Quick Action’. You can access the application directly by clicking on the button. Please note that it may take up to 30 minutes for your application to install.
How to add users to your instance?
It is possible to invite people to your n8n instance by following their step-by-step guide here. Please note that the invited users will not receive an email notification with the invitation link.
To share the invitation link, simply copy it and send it to the user you’re inviting to your instance.
I forgot my password to the application
Contabo does not manage or store customer passwords.
When setting up your server, you choose a password that is used both for accessing your VPS/VDS and for the application itself. This applies to both new orders and reinstallations.
If you have changed the initial password, Contabo does not have access to or visibility of it.
- If you have linked your email to the application, you can use the “I forgot my password” option on the login page to reset it.
- If you have not linked your email, the only way to regain access is to reinstall or perform a new installation of the application. ⚠️Please note that this will result in data loss.
Resources
Please note that after the installation, you are responsible for maintaining, updating, and troubleshooting the application.
In case you need assistance, please refer to the official resources:
Was this article helpful?
That’s Great!
Thank you for your feedback
Sorry! We couldn't be helpful
Thank you for your feedback
Feedback sent
We appreciate your effort and will try to fix the article
